Just a quick post for anyone using the TICK stack and finding Kapacitor is generating duplicate alerts.
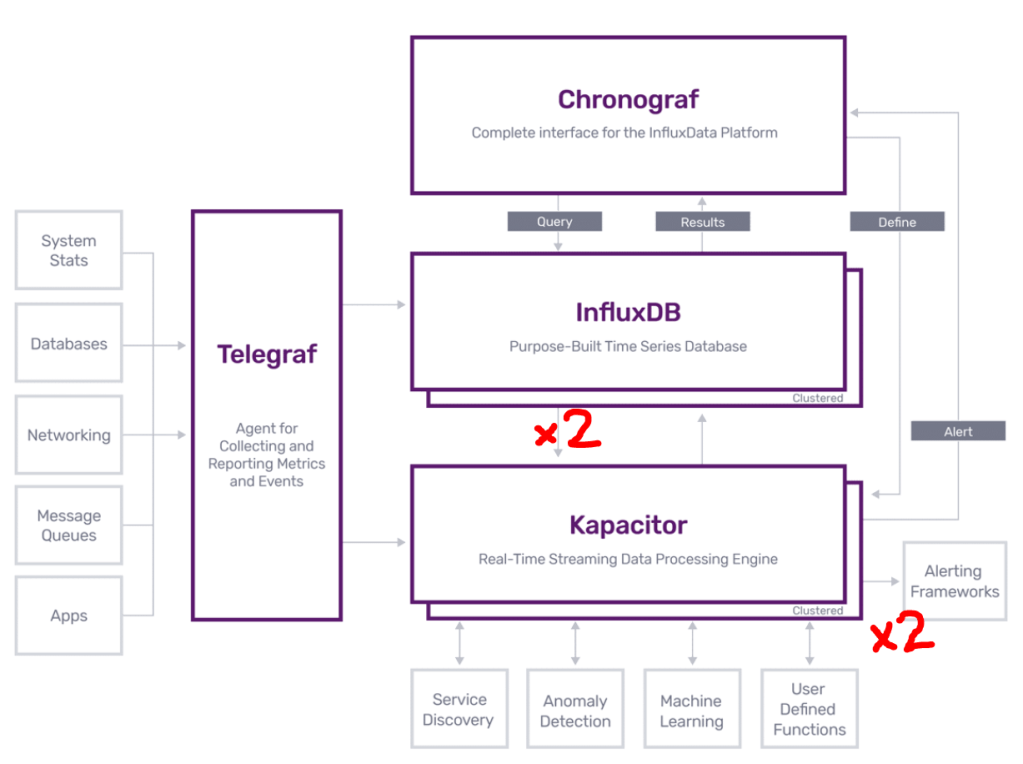
To allow Kapacitor to get a stream of events from InfluxDB it creates a subscription for itself in InfluxDB with it’s URL i.e. http://kapacitor:9092. The subscriptions include it’s ServerID or ClusterID. This happens first time Kapacitor starts where no existing subscription is found with it’s Server/ClusterID.
What can happen is that if the configuration of Kapacitor changes, causing it to have a new ServerID or ClusterID. Then Kapacitor will create another subscription for itself with it’s new ID. Resulting in InfluxDB containing two (or more) records for the same Kapacitor URL. This can cause each event to be sent to Kapacitor multiple times.
This commonly occurs with Kapacitor under Docker, if for example you switch to another Kapacitor repo.
To check if you have multiple subscriptions in InfluxDB pointing to the same Kapacitor URL login into Chronograf and run the command “show subscriptions”
There have been feature requests and issues raised around this, particularly for Docker. Ideally it looks like Kapacitor removes its subscriptions in InfluxDB when it shutsdown. https://github.com/influxdata/kapacitor/issues/870
Recently I encountered an issue with vSphere where I could not vMotion VM’s between hosts in the same cluster, even though they were the same generation CPU and EVC was enabled. This was interesting to troubleshoot, so I thought I would post my learnings and solution for anyone else encountering this problem.
Firstly this is the error seen in vCenter Tasks when vMotion fails to migrate a VM encountering this problem.
The target host does not support the virtual machine's current hardware requirements.Use a cluster with Enhanced vMotion Compatibility (EVC) enabled to create a uniform set of CPU features across the cluster, or use per-VM EVC for a consistent set of CPU features for a virtual machine and allow the virtual machine to be moved to a host capable of supporting that set of CPU features. See KB article 1003212 for cluster EVC information. com.vmware.vim.vmfeature.cpuid.mdclear
In summary what has happened here is related to mitigation of recent Intel CPU vulnerabilities. Mitigation’s are implemented using new CPU features, which are exposed to VM’s via the hypervisor. If all the hosts don’t have the correct ESXi patches or CPU microcode updates, or they haven’t been applied correctly these types of errors can be encountered when migrating VM’s.
VMware have tried to maintain vMotion compatibility within clusters by having EVC hide these CPU features from VM’s until all hosts in the cluster have the mitigation applied. But in some situations this does not seem to be working correctly, resulting in VM’s powering on with the CPU features not all hosts in the cluster are compatible with which breaks vMotion compatibility.
All hosts in the cluster were Sandybridge generation CPU’s, running ESXi 6.5 EP 17 (Build 14990892) and had hyperthreadingMitigation enabled. Though I have seen this problem with ESXi 6.7 P01 (Build 15160138) so the version is not relevant, except that these builds include the mitigation for the Microarchitectural Data Sampling vulnerability.
To troubleshoot the first step was to find which hosts were able to provide the MDCLEAR CPU feature to VM’s. To determine this run the following from the ESXi shell on each host.
vim-cmd hostsvc/hostconfig|grep -A 2 MDCLEAR
On hosts which can provide the feature, this is the output.
Another step which can be done to determine which VM’s are already running using the cpuid.MDCLEAR CPU feature, is to check the VM’s vmware.log stored in the folder with the VM’s VMX file. VM’s with this entry in the log won’t be able to vMotion to Hosts which are lacking this feature.
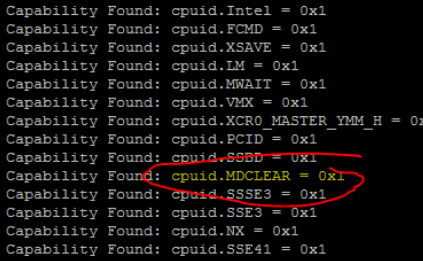
On VM’s which are using the cpuid.MDCLEAR feature, a log entry of “Capability Found: cpuid.MDCLEAR” will be seen. Use this command to check a VM’s vmware.log.
cat vmware.log | grep -a MDCLEAR
or
cat vmware.log | grep -a Capability
So now we have found which VM’s and Hosts are affected.
Solution
In my case the solution was very simple, we knew that for some reason one host was not capable of using the MDCLEAR CPU feature. Even though it was running the correct ESXi build and so should have the correct microcode (via the ESXi CPU microcode loading feature) and ESXi support for it.
I found a post suggesting that a cold start of the host maybe needed. So after completely powering down the host and powering it on again, the host worked correctly and the MDCLEAR CPU feature was available. vMotion to the host started working.
I’m not really sure why this worked but suspect for some reason, ESXi was not able to load the microcode on that host when it was last booted.
Another solution may have been to upgrade the BIOS to the latest release from the vendor, if available which includes the MDSCLEAR CPU feature.
Be aware these types of problems have been encountered with mitigation for prior Intel CPU vulnerabilities, so these troubleshooting steps could be relevant to those. For example.
There’s a major bug which has affected NZ and Australian VMware users today, and is expected to hit users in the rest of the world when their clocks roll over to 12th of August 2008.
It prevents any guest operating systems from starting or using VMotion on ESX and occurs in VMware’s latest version ESX 3.5 update 2 (build 103908) which was released on the 27th of July 2008.
The bug seems to be within the licencing system and only occurs after 11 of August 2008.
When trying to start a guest operating system the alarming message “A general system error occurred: Internal Error” is displayed.
Messages below are displayed in /var/log/vmware/hostd.log, and the log file for any virtual machine which is attempted to be VMotion’ed or Powered on : Aug 12 10:40:10.792: vmx http://msg.license.product.expired/ This product has expired. Aug 12 10:40:10.792: vmx Be sure that your host machine’s date and time are set correctly.
For now the only workaround from VMware is to adjust the clock on the ESX/ESXi server back to before the 12 of August 2008.
Here are some instructions on how to do this. Turn off NTP (if you’re using it), and then manually set the date of the hosts back to 10th of August. This can be done either through the VI Client (Host -> Configuration -> Time Configuration) or by typing date -s “10/08/2008” at the Service Console command line on the ESX hosts. Update 14/8/2008 Turned out to be a major bug, took VMware a couple of days to release a patch. It’s available here with more details. http://kb.vmware.com/kb/1006721.html
A recent discovery of mine is the ability to add additional POI’s (Points of Interest) to in-car navigation systems. Initially was sceptical about the usefulness of this, until I found some community sites which allow you to download pre made POI files. There is a huge variety available based on Country, Category or both. The most useful site was the GPS POI Data Directory http://www.gps-data-team.com/poi/, used this to add a Safety POI’s which included Speed Camera locations to the already preloaded POI’s in the navigation system. This site also had icon files and instructions showing the correct installation method and settings for most navigation systems.
Sky released an update for it’s digital decoders recently which enabled most models to output component signal via the scart connector. You can check which version you have by looking at the bottom of the Sky Decoder on the Telepermit sticker. SKY decoders upgrade
After 2 weeks of trying to get this working, probably 6 hours work all together. I’ve finally found a solution. I was getting error code 81000306 everytime I tried to login from Live Messenger both version 8.0 and 8.1 beta. Also Gaim and Trillian could not connect to MSN. Tried Safe Mode with Networking, Disabling Services, Uninstall, Reinstall etc. Anyway it turns out Windows Vista has a new facility to tune the size of the receive packets it receives, I guess this helps with large file transfers. This ‘Receive Window Auto-Tuning Level’ seems to be incompatible with my ADSL Router (NetGear DG 834). The solution is to either to disable it or change the tuning level to restricted.
This is the command to view the autotuninglevel netsh int tcp show global
This is the command to disable it. disabled: Fix the receive window at its default value. netsh int tcp set global autotuninglevel=disabled
This is the command to return it to the default normal setting. normal: Allow the receive window to grow to accomodate almost all scenarios. netsh int tcp set global autotuninglevel=normal
This is the command to set it to restricted which is what I ended up using, so I get some benefit from autotuning. restricted: Allow the receive window to grow beyond its default value, but limit such growth in some scenarios. netsh int tcp set global autotuninglevel=restricted
BTW to run these commands you need to right click on the command prompt shortcut under start accessories and select run as administrator.